One of the most difficult techniques to master is
Carving on Telemark Skis.
Compared to moguls or steep skiing, I feel that carving is a more complex technique to master.
And in the last 4-5 seasons, I really focus on improving my carving.
—
I’ve been carving for 20 years but the ability to carve on any surface and slope is definitely still a challenge. I would say that my first passion as always been powder tree skiing. Then, I spent a lot of time in moguls,it is only in later years that carving has become a real passion.
I’m lucky enough to have probably the best technician in Canada, Denis Vezina, teaching at my home resort. He represents Canada at Interski. His telemark technique is flawless, and he has the ability to dissect my skiing better than anybody. His knowledge has allowed me to improve significantly my technique.
Here are the things I think I’ve changed or improved over the last five years. Note that these are tips are what made a difference for me. It’s areas I focussed and that has given me results.
If you want more general tips on how to carve, check this post here.
Telemark Carving Skis
OK first I got real carving skis. One GS and one Slalom ski that I mounted on NTN Freerides. This is a game changer for sure, especially my Salomon slalom with 13 m of radius.
Here are my quiver for 2022.
From left to right:
Black Diamond Helio 115 (2020-21) with Meidjo 3 and alpine heelset. Powder skis used almost exclusively in the backcountry
Black Diamond Impulse 98 (2021-22) with Meidjo 3 and Alpine heelset. All Mountain skis that I mainly use for resort skiing, ski patrolling, slack country.
Dynastar Speed Course Comp 64 GS skis (2007) with Rotofella NTN Freeride (with switch plate)
Salomon X-RACE 65 (2013-2014) with Rotofella NTN Freeride (with switch plate). This is the ski I use the most to focus on my carving.
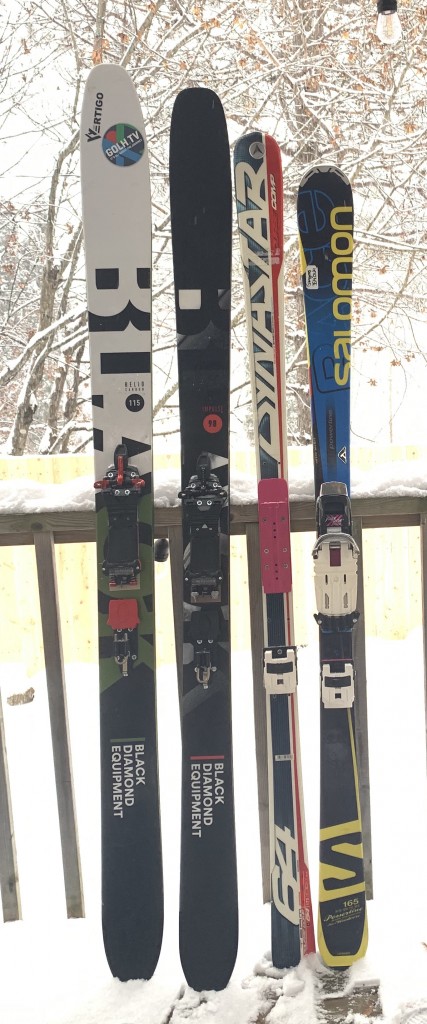
Those two skis although older are SO much better on groomed snow than any skis I’ve ever tried. Really, it’s cheating compared to a 90mm modern ski.
Both hold an edge like crazy and speed is not a problem.
I use the Salomon the most. I love the short radius feeling. But I will spend a lot of time of the Dynastar GS ski in this season to try to master this beast of speed. It’s crazy how you need some serious courage to really push a GS ski.
I have them mounted on the NTN Freedom which are Okay but I’d love a more progressive binding such as the Bishop BMF 3 or even a Meidjo 3 with its incredible lateral stiffness.
TELEMARK CARVING TIPS
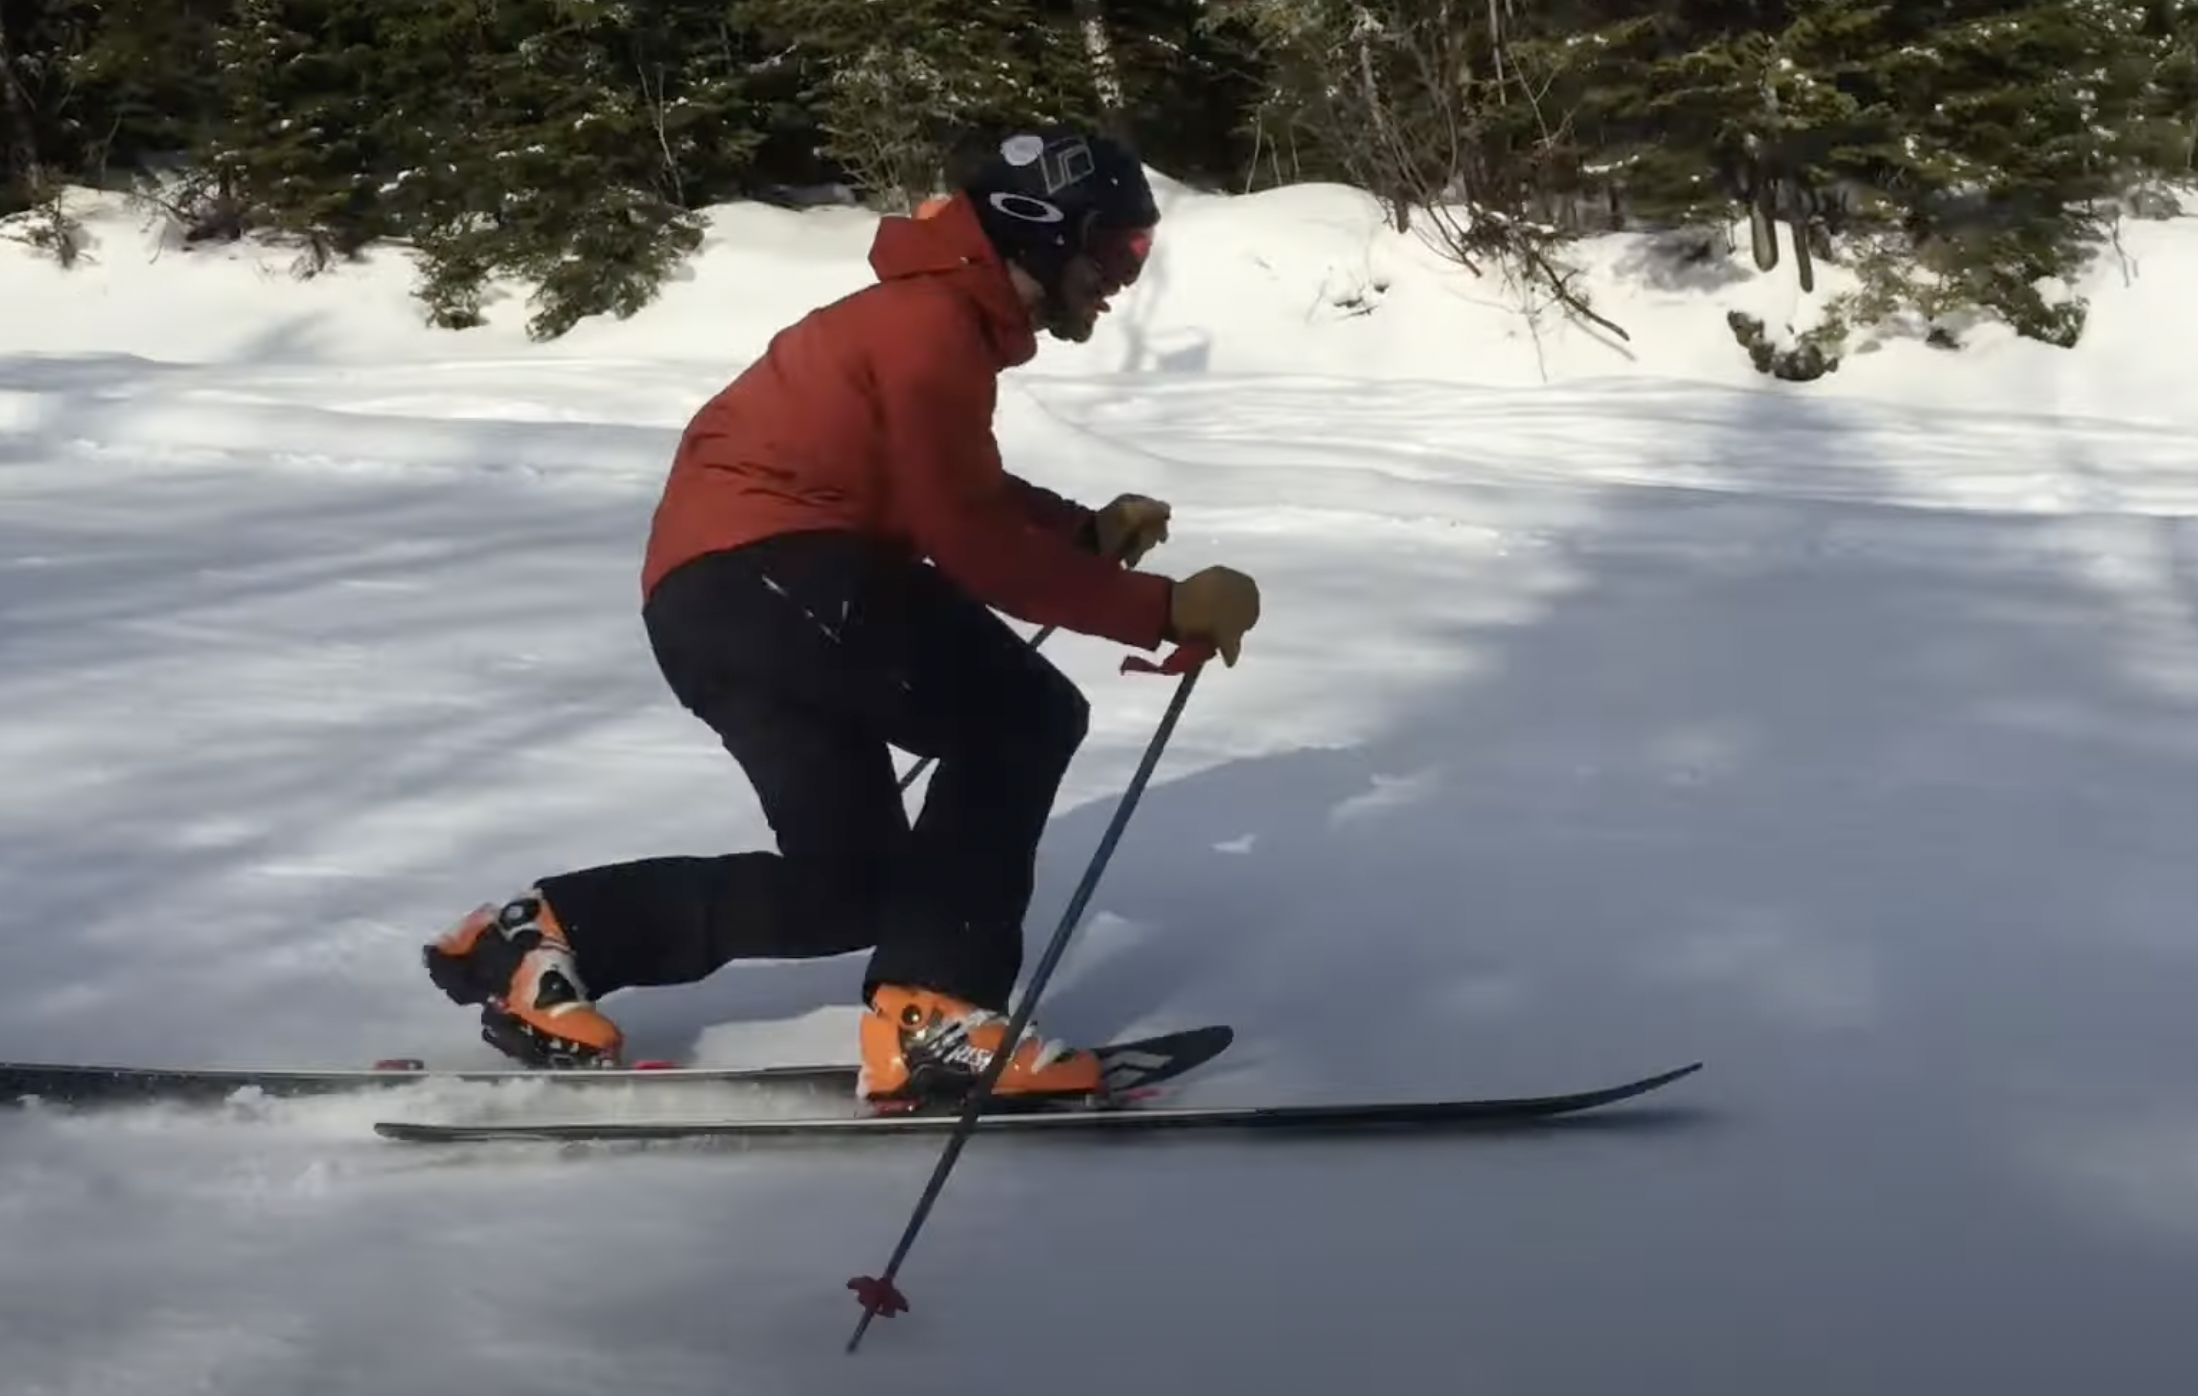
Outside Ski
Telemark skiing in all conditions, I’ve spent a lot of time trying to stay balanced in variable conditions such as moguls, powder and I was a big proponent of having your body weight distributed evenly 50% – 50%. I still think that this ability is great in a lot of situations but for carving I’ve definitely moved away from that to focus on 70% on the front ski which in terms of technique is described as being the outside ski to the centre of the turn.
There are many reasons why this is helping, but the main reason is definitely edge pressure. The other one is the way you can increase your angulation.
70% is just a mental reference, and I have never measured the actual percentages. And there is a limit to how much pressure you can put on your outside ski to keep your telemark stance efficient and balanced. Finally, I would say that the weight distribution varies during the turn and depending on turn shapes, so I could say a lot more on the subject.
Rotating the femur
This was a new concept for me
I am very good to angulate from the knees and I love to use my back knee to create a good edge angle. But this tip uses the biggest articulation in the body and for this reason is super strong to oppose the forces of carving.
At the start, when I feel that I’m strongly edging, I will focus on rotation my femur on my outside leg (front leg). This will help a lot to create opposing force to the turn and to start turning. I’m still exploring this feeling so more to come in the future.
This can only work if you have a good weight distribution, meaning that you need 70% on your outside (front ski). So here is another reason why overloading the outside ski is great.
Early Edging
Focus on horizontal extension at the start of the turn to get the new lead change edging as fast as possible.
I did understand the advantages of horizontal extension, but I now understand the advantages of an earlier extension to gain earlier edging.
I focus on the moment of release at the end of a turn. This needs to be a combination of letting the skis go under you into the new turn a bit passively and to put pressure immediately on the new outside ski (this will become your front leg). This weight shift is the key to get the early edging and this allows the skis to bend into the carving arch sooner, creating a nice constant turn.
So really the goal is to preload the ski to arch sooner so that when the pressure builds up in the turn, the ski is already in the right shape to push against the snow. I would say that this is the key to start carving in steeper terrain and at higher speeds.
FYI, this early edging is right before the femur rotation I talked about above.
Breathing
Focus on breathing out at the end of a turn.
This tip has helped me tremendously and it was the first tip that Denis gave me that I was like: Okay, this guy really knows his stuff.
Telemark is a lot about coordination. To breathe out at the end of the turn as many advantages. First and foremost, it helps synchronize the most important part of the turn, the lead change. I feel that by exhaling at the end of the turn, it gives me a timing and rhythm to consistently start the sequence of the turn.
Second aspect might be psychological, but it works for me. Actually, it works really well. I feel that by breathing out, I have more room to angulate at the end of the turn. Try it, it’s fascinating. It’s like if my body is freer and it gives me a last little movement to really help close the turn.
Closing the turn means that you slow yourself by completing the circle of the turn a bit more like if you were going more uphill. (This is just a figure of speech as most often we don’t literally go uphill.)
I like to play with the breathing out speed, exhaling slow on long radius turns and exhaling super fast in short radius turn.
Different angulations
Breathing leads me to talk about different types of angulations.
Explain briefly, angulation puts your mass over your edges by moving your upper body in a C-shape. You can angulate from the knees, from the hips and the spine.
For this article, I want to focus on hips vs spine. I never understood that there was a difference between the spine and the hips moving to counterbalance the forces of the turn.
This year Denis was focusing a lot on my hips moving at the start of the turn. He then told another participant in our clinic to stop using the notion of squashing an orange into your rib cage. This is what I will call spine angulation.
This is a tip given by Mike And Allen famous Telemark Tips book.
I was surprised by Denis comment and we didn’t get the chance to talk about why he gave that telemark skier that tip.
But it struck me that this was actually two separate movements.
So I started to experiment. At slow speeds, moving only the hips is definitely not working as it’s just too big of a body part. On the opposite moving only the rib cage into the hip bone (Spine angulation), squashing an orange is not strong enough at higher speed and is a more complicated movement for steeps than simply moving the hips.
So here is where I stand and that I’m experimenting with. I now start the turn focusing on moving my hips, like if I was sitting inside the turn. This movement focusses on keeping my upper body straight and to angulate more as the turn progress. This is what I call hip angulation. It typically happens between the start of the turn and a bit pass the fall line at the middle of the turn.
At one point I will be limited on how much I can angulate from the hips, and depending if the turn needs more angulation, I will then start to arch my spine, moving my chin over my outside ski. This will get my spine to arch more and more and to cork my upper body over my edges. This is where the tip to breathe out actually helps create even more of this spine angulation.
Sharp Edges vs Race Sharp Edges
I’ve always known that sharp edges are important but this next tip is the real cheat code.
Getting new skis every year, I know that sharp edges are a game changer. Over the years, I’ve gone from sharpening my own skis carefully, to sharpening then very crudely, to not sharpening them at all.
You have to understand that as a ski patroller the chances of hitting a rock during a day are very high. So the dedication to keep edges sharp are mostly a waste of time.
Having dedicated carve skis have changed that.
The Cheat code I’m going to share now is definitely not for everyone.
Read this carefully, you need to be very confident and skilled to do this safely. But Oh my God, what a change.
I started to have my skis sharpen at an aggressive angle like ski racers.
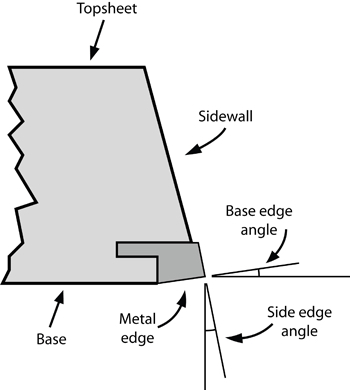
Ski manufacturers typically have angles that will enable the average skier to perform on any terrain. Those angles are the base angle of 1 degree and the side wall angle of -1 degree. Technicians usually refer to this side wall angle saying 89 degrees.
I went from a side wall of 89 deg to an angle of 88. This per se will not make major improvements.
I went from a base angle of 1 deg to an angle of 0.5 deg.
This combination is the cheat code. Edging as become SO easy. The difference is CRAZY. Really.
But it comes at a price. Your ability the slip in and out of your carve is drastically reduced, meaning that your skis will want to edge and to stay on edge. To reduce that, you can unsharpen the edge at the tip and tail, but in my mind, it defies the reason why you got them to sharpened this way.
Racers will even go to even crazier angles such as 87 and 0 degrees, which I am not ready to try. This is how they succeed in staying on their feet when completely off balance on crazy steep icy slopes. Because you can clearly see the off balance is supposed to make them fall.
AAAAAH Now I know how they do it.
Here is a progression I would suggest trying as you improve your skiing.
All levels of telemark skiers who want to carve: Keep your edges super sharp, sharpening them every couple of days on the slope. If you can, use a diamond stone after every day on the mountain.
STEP 1: You want to start to learn to carve on green runs, keeping both skis arching and leaving two tracks behind you – » keep your edges at 89 and 1 deg which is the manufacturers recommended angles, unsharpen the tip and tail about 10 cm.
STEP 2: You want to start carving on blue runs, keeping your skis arching and leaving track behind you in good grooming condition. – » Keep your edges at 89 and 1 deg but do not unsharpen the tip and tail.
STEP 3: You want to start carving on green and blue runs in hard-packed conditions (not icy yet) -» increase your edge angle to 88 and 1 deg (or 88 and 0.7 deg if your ski tech can do that) do not unsharpen the tip and tail.
STEP 4: You want to start carving aggressively on blue and maybe black runs -» increase the edge angle to 88 and 0.5 deg. do not unsharpen the tip and tail.
STEP 5: you want to race and carve aggressively no matter what – » well I’m not there yet and I would use caution here advising you on something I’m not familiar with. Maybe it can come back in the future and keep you updated.
I would suggest you take these steps very slowly, maybe trying one setting for at least one season.
Also, changing edge angle will remove a lot of metal on your ski edges, using them prematurely, so make sure you don’t go back and forth too many times.
Did you like this kind of format of blog?
I understand that this is not going to help as many telemark skiers than other lessons I’ve given. I give you my perspective, what I’m working on and what I have improved lately.
Leave a comment if you have any question or to share your perspective on carving on telemark.

What others think about it