BMF Bishop Full Review

Bishop BMF Review 1-2

Last season I spent a very good amount of time on the Bishop BMF bindings. I tried the NTN and the 75mm versions.


The Bishop Moto: THE GOLD STANDARD IN BADASSERY

Well, that’s true. Their products are badass.

Coming from the very Burly Bishop Bomber was truly a very reliable, biffy binding. It had a very good reputation and thus a following.

Came the NTN revolution and now, the Telemark Tribe need to have NTN boots and binding, right?

Flexibility

Well, the Badassary Mojo is more than that, the BMF comes in an NTN or 75mm option.

They have created the most flexible binding on the planet.

  • You can choose 75mm or NTN
  • If you were to change from 75mm to NTN in the years to come, you can send the binding back to Bishop and they will modify it for you at a reasonable cost.
  • This binding fits all boot sizes. OK not all sizes but there is no small or large option, the BMF can be adjusted from boot sole 270 to 346mm which is about size (mondo 22 to 31) This is really nice for reselling your stuff or replacement parts
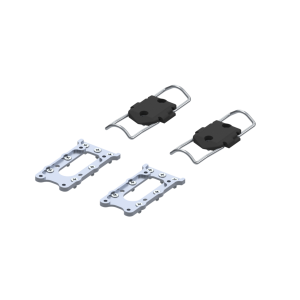
  • Plus, you can get a switch plate to easily swap your binding on many skis.

BMF-R_HD3_Switch_Kit_600x


Skiability

This is the real question and it took me 5 minutes to say that I really liked this binding.

In short, it skies great. It’s powerful, there is no dead zone and the amount of adjustability makes it a great choice for anyone but the purist who want a true neutral feeling

Trying both options is an eye opener. Really!

To a point where I want a go back to 75mm.
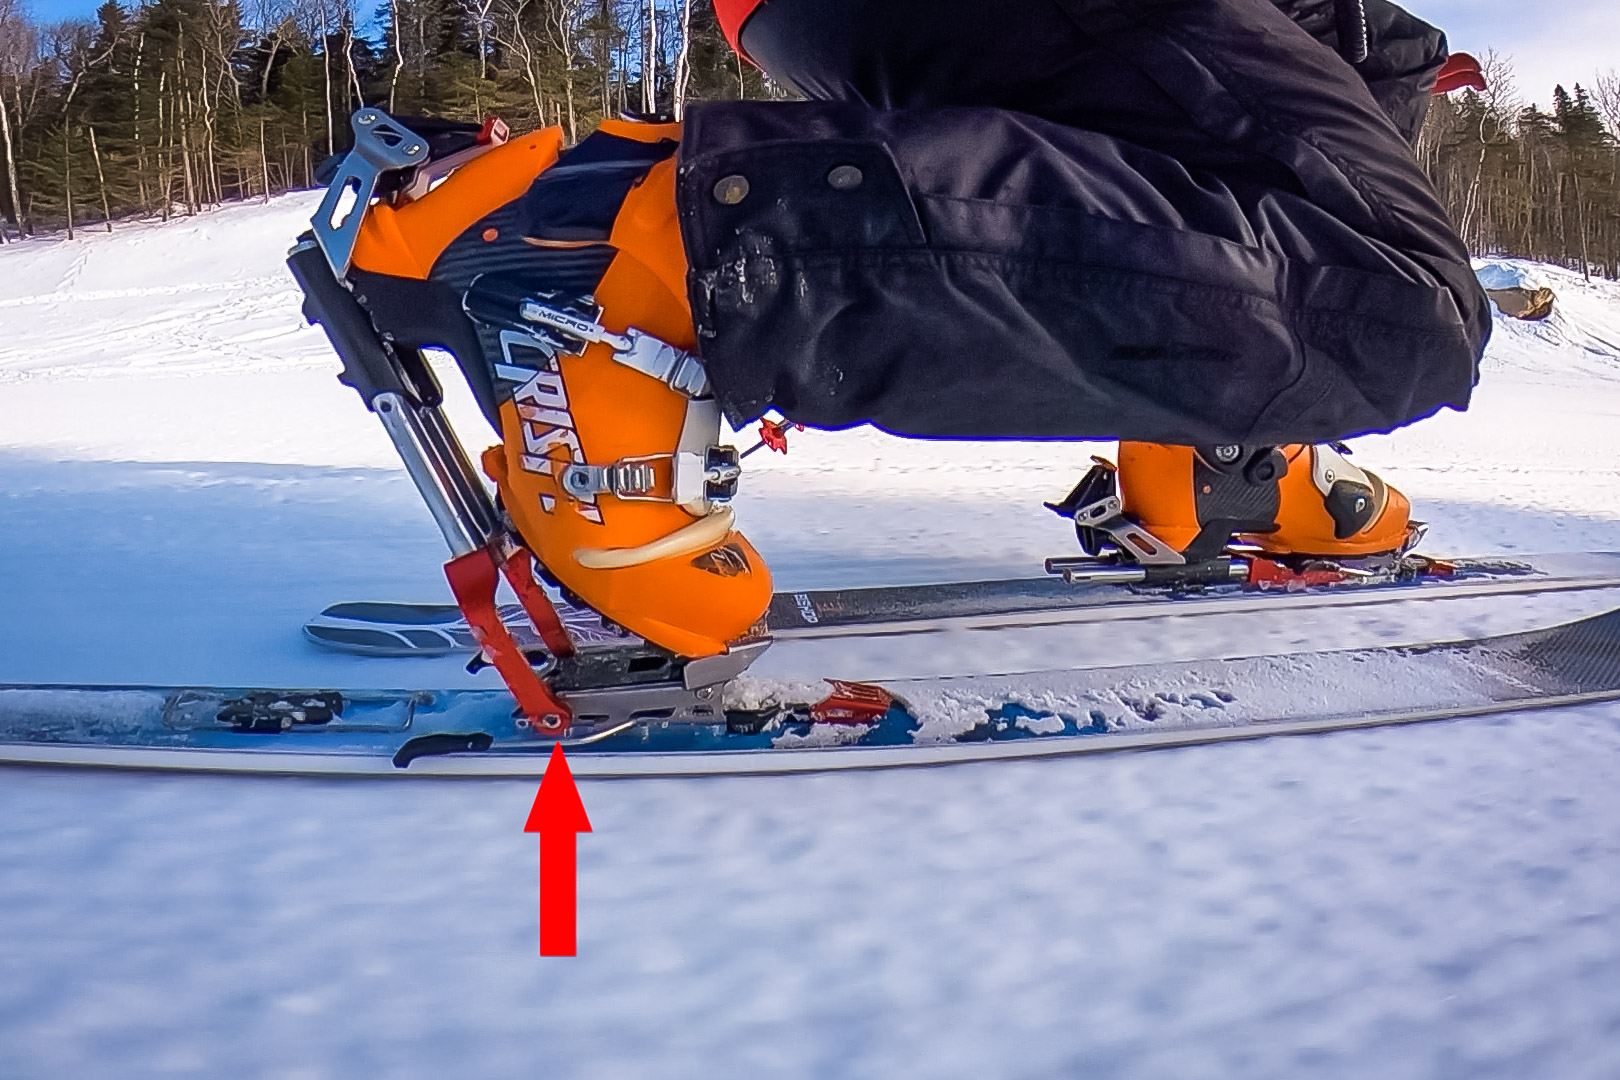
BMF 75mm

Okay not full time but still, I had so much fun.

First off, the 75mm is just a great option that skies really good. It’s powerful yet you can adjust it the way you like, to get a more neutral feeling.

Plus, when you think about it, this 75mm binding is the holy grail of 75mm binding. Well almost.

  • You can a great skiability
  • You get brakes
  • you can an incredible step in

This is what resort skiers have been asking for decades.

As for no dead zone, that is something 75mm bindings have always struggled to achieve. The way this binding is engaging the boot is superb for the experts telemark skiers that demands a reliable balance in all the phase of the turn.

BMF NTN

The NTN version is also a very good binding that delivers a lot of punch. I quite enjoyed them and this has rapidly become my go to binding for the resort.

The real big difference over the competition is the ease of the step in step out. It really is better than anything else I have tried.

For this, I will mention that boot has an impact on this so take this considering I’m skiing with the Crispy Evo WC. But honestly, this is the closes we have ever been to the real step in of an alpine binding. Having a binding with a brake, that you can easily step in and out is such a joy when you are working as a ski patroller. It really makes my days easier.

Touring or not touring

As binding have become more and more active, you need a resistance-free mode to walk around the mountain. The Bishop offers their binding in the R version (stand for Randonnee) or the 3 (for non-touring.

This is really great because if you don’t need the touring option, you can save some money and weight and get a traditional binding.

But if like most of us, you end up adventuring in the backcountry, they offer a touring, resistance-free mode. Okay, it’s still a full frame binding, but it’s the best there is. It’s got a great ROM that the Outlaw X according to my tests.

Durability

Like I often say, I’ve never had a telemark binding not fail on me. And the BMF did have minor issues. Watch the video above for in depth description of my problems. But, like most companies, this problem was fixed during the season and I think it’s safe to say that this is one of the most durable bindings on the market.

Final Thoughts

Bishop has nailed it. Really.

If you are looking for a resort binding, if the step in step out is something important look no further, the BMF is just above the competition.

It skis very well in both 75mm and NTN version, it’s super flexible and will last you a long time.

The only thing still missing is a release binding. For that, you will have to look at the Meidjo which as the most sophisticated one on the market (Just my thoughts here, no hard data showing this)

Just to be clear, I still think the Outlaw X is a viable option. The 22 design Outlaw X only real disadvantage is the step in with a brake.
The price is still a major bump. At the time of posting, the price for the BMF-R is 699$ USD vs the Outlaw X at 399$ USD.

So you will probably use the switch plates and all the flexibility this binding as the offer.


My Teaching Philosophy for Telemark Instructors

10841787_352796034903758_8497878569894672367_o

Hello Telemark Tribe,


I was contacted by CANSI, the Canadian Association of Nordic Skiing Instructor to write a paper to my fellow instructors. Unfortunately, it never got published so I taught I could share it here.

Here is what I wrote for my fellow teachers.


When I teach telemark skiing, my number one objective is for every student to retain a clear learning objective and to know precisely how to achieve it. 

Too many times, I have taken the wrong approach by trying to have my students find instant results with advice such as: “Do this, move like that…” Sometimes it works. But often, it does not.

As telemark skiing instructors, we want to give our students several tools to achieve a given movement. Our goal is for them to be confident in the way they improve.

Introduction— The Absolute Telemark Way:

Every time I meet with students, I want to know two things: What they feel good about (their Positives) and what they want to improve (Their Objectives).


The positives

First, I will ask them about their experience, their strengths and what they have improved on recently. My goal is to quickly assess their mental game, because learning starts in one’s head. I am looking for positive thoughts. I will ask about things that they feel good about:

  • Types of terrain (groomers, steeps, trees…)
  • Types of turns (short, long, speedy or not…)
  • Types of telemark stance (low, active, high…)

I only ask specific questions if they cannot seem to bring positive ideas. I want to know what makes them feel good before what they want to improve.

If they are new to telemark skiing, I will ask them about their skiing or snowboarding abilities, or other sports they practise. 


The Objectives

Subsequently, I will ask them about their expectations and what they hope to improve.

All this takes about three minutes. If I have a large group of students, I will shorten this part and go for a direct question:

“Describe your telemark skiing experience and comfort level.”

Once I have compiled everyone’s input, the lesson starts. 

I could go many ways from here, groups, first timers… But for this article, we will use the example of a one-on-one lesson with an experienced telemarker searching to improve.


Initial Approach

We start with a warm up run. I will lead for the first third of the way. Then, I will stop to see how my student is doing. I will then let them take the lead so that I may assess these points:

  1. What is making them waste energy?
  2. How is their body balanced?
  3. What path or choice of lines do they make going down the mountain?

I want to integrate the student’s requested areas of self-improvement to what I observe and apply it to a specific type of terrain. 


The Path to Improvement

People like to know promptly what you think of their skiing. I will often stop my students before the end of the first run to give them immediate feedback. If you both see eye-to-eye, their confidence in your teaching skills will be boosted.

Be forthcoming in your evaluation but, formulate it so that they feel their past efforts were not in vain. Remember to remind them that what they are doing is working for them. 

“If you do something and you feel it’s working, then it’s working. If you feel like you are doing something wrong, then it’s most likely wrong.”

It is that simple!


Then, introduce one thing that they could improve on. It has to be related to their learning objectives. It does not have to be directly related. But it needs to be brought up as part of their progression plan. For example:

“I see that you have good balance and that your telemark stance is solid. This is good because it will enable you to gain more rhythm, make tighter turns in the steeps like you talked about achieving. One of the keys to really improve your rhythm is how you use your hands.”

BOOM! 


You just reminded them of their positives, you have pointed out a possible solution for them to reach their goals. The direction: better rhythm, and the way to get there: your hands, are clearly pointed out. 

You now have their full attention. They will focus on doing precisely what you suggest, knowing that it will lead to them achieving their goals.


Building a Plan

This is the “easy” part. This is what we do as a telemark skiing instructor: Build a series of exercises that will get your student to discover new movements, thus getting them to where you think they should be.

Here are a few things that make a plan work regardless of the selected drills:


Share the Plan Before Doing the Exercises. 

Take a minute to explain to your student the expected outcome of your plan. 

What will they gain? If the exercise is about hand movement to increases pivot or rhythm, tell them. Relate it to the end goal; Hands = one step closer to their objectives.


Move Quickly From One Exercise to Another. 

Do not stick with one exercise, even if it is working. If it is working, find a variation. If it is not working, find out why and try to address it in the next exercise. 

Find “Ah! Ha!” Moments. 

If you feel that your student has had a great gain, celebrate it. Talk about the success. Try to integrate it to their skiing.


The Psychology of Learning


Remember the moment you learned something new and how you felt about your past struggles, your previous failures and successes? That is the teacher’s challenge!

Now that your students have been working hard for an hour or two, get them back to something they feel good about: terrain, types of turns, body position…


Finish With a Positive. 

Find a way to reveal their original skills at the end of the lesson. Link the newly acquired skills to their original positives. If you did it correctly, your student will feel like they have improved one or more aspects of their telemark skiing technique. They will know what to work on to keep improving. They will associate their learning to you, the instructor.

The worst scenario is a student leaving the lesson more confused than before. They will feel frustrated because they just do not get it. 

Or worse, they will think that they have to learn something completely different because they had it wrong all along. This mindset will not lead to a quest for improvement.


Remind yourself the following:

  • Everybody learns at their own pace.
  • Everybody can execute something in the way their mind tells them to; But the mind has to send the correct instructions.
  • You are responsible for the message in their minds.
  • Practice remains the number one factor for improvement.
  • There is more than one road to progress. 
  • Remember that your taught approach is not the only way to success.


Finally, you have to remind your students the number one rule of learning:

“If it feels good, it probably is. If it doesn’t feel right, it probably isn’t.” 

Because you finished the lesson on something that your student already felt like they were good at, the positive effect will create a good mental state to keep working and improving. 


But there is more to it… It is called proprioception!

I will talk about proprioception next time. In the meantime, you can Google it if you are curious.

That’s it for now,

René-Martin his a certified telemark instructor. He is the creator of Absolute Telemark. You can book a private lesson here